
How to work with Ecto Migrations and How to manage data with associations
14 minutes to readSpecial Announcement
Hey folks, I launch my first Elixir/Phoenix LiveView course. In this course I am teaching you how to create the Wordle Game with Elixir and Phoenix LiveView. In this course I teach you about elixir, TDD, how to organize your project, how to create and use function components, how to create and use animations with TailwindCSS and Phoenix LiveView and in the end you will have a complete functional wordle game to show to your friends.
The course is with a special offer with 50% of discount. Go here and check it out:
https://indiecourses.com/catalog/54c9e6b0-f39e-43a5-b775-a0de3f634b58
How to create migrations with Ecto And How to insert data with associations
This post belongs to a series of posts about Ecto. This is the first one.
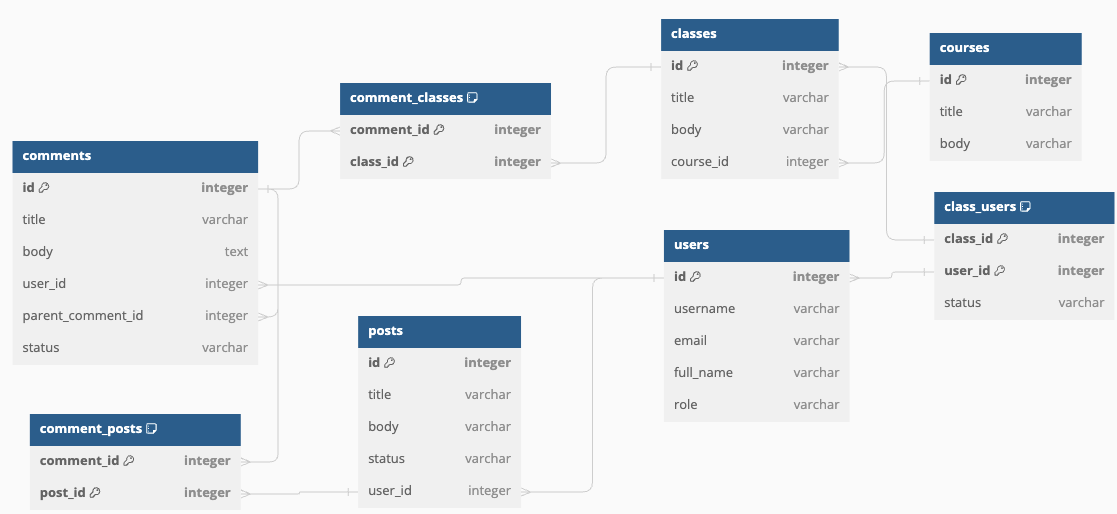
When you are starting your project you probably have a design concept or a sketch of the UI ready. But one of the things you also need to have is the domain model of your application and they are usually tables in a database.
But in the beginning of the project you don’t have any tables yet. Maybe you don’t even have the database. And it is at this point that Ecto will help you tons.
In this post I will walk you through the process of generating the tables and the schema for your blog/courses application. And to make things easier but not so simple we will cover a data modeling for a fictional website where we have the ability to do posts and create courses and classes, and other people can commenting on them. And not only that, people can also comment inside a comment, same way as you see in many websites out there.
So here it is your domain model:
When we generate migrations for those tables, the first thing we need to understand is that we need to generate them in a specific order. Otherwise you will need to add more migrations that will alter the tables so we can add the fields we need and we don’t want to do that right now.
There are multiple ways of doing the migrations but the consensus is that we generate a migration for each table we create. You will see that some libraries generate more than one table in the same migration but this is not very common.
This is not a Phoenix tutorial but it is fair to say that the easiest way and it is probably the way you will do is to create a phoenix project like this:
mix phx.new NAME_OF_THE_PROJECTAnd then you will need to run the code below to create the database.
mix ecto.createNow you are able to create the migrations. Let’s start with the users table because it is a table that don’t have any dependencies with any other table and we have tables that depends on the users table. To do this you will execute the following code in your shell:
mix ecto.gen.migration create_users
This will create a file in your PROJECT_NAME/priv/repo/migrations/20240401150050_create_users.exs. All migrations will go to the repo migrations folder unless you specify otherwise through the options that are available to you. All migrations will have the name with the same format of: YYYYmmDDHHMMSS_name.exs.
The structure of this file will be something like this (assume the name of the project for now on is BlogPosts):
defmodule BlogPosts.Repo.Migrations.CreateUsers do
  use Ecto.Migration

  def change do

  end
end
You will need to write your own code now to create the tables. After you do it, the code will be like this:
defmodule BlogPosts.Repo.Migrations.CreateUsers do
  use Ecto.Migration

  def change do
    create table(:users) do
      add :username, :string, null: false
      add :full_name, :string, null: false
      add :email, :string, null: false
      add :role, :string, null: false

	  timestamps(:utc_datetime)
    end

    create index(:users, [:username])
    create index(:users, [:email])
    create index(:users, [:email], unique: true)
  end
end
What we did here?
There is a lot going on here. We use a lot of private words (commands) in this migration. I will go one by one so you will know what they do:
- create => This command will create a table. It seems obvious but I am not making any assumptions here.
-
table => when we use the command
createwe need to specify what we want to create, in this case a table. We need to also specify the name of the table which could be an atom or a string.
The create function receives a block and inside the block we add all the columns we want to add for this table. In this example we have two commands:
-
add => this command creates a field and receives a name, a type and some options. In this case we are only using the option
nullto specify that the columns are not null in the database. -
timestamps => this is a function that will generate the columns
inserted_atandupdated_atto your table. Usually these columns were generated asNaiveDateTimebut you can also specify other types of datetimes as we are doing in this case.
It is important to say that the string type we are using in all the fields, for postgres is usually converted to varchar with a max length of 255 characters. If you want to specify a field smaller than that you need to use the size option like this:
-
size: 20
If you also want a string field without limit you will need to use text instead of string . And if you want your field to be case insensitive, in postgres you can use the type citext but you will need to install an extension for postgres. (I will cover this and other postgres specific things in a future article)
In this example I am also creating an index for the username and email fields. As you can see I am setting one field at a time when creating the indexes. One might ask, why didn† you set all the fields in the same line, since you are informing a list of fields. There is a good reason for that.
A little bit about indexes with Postgres
Postgres can work with single column indexes and multi column indexes. What is the difference you may ask? Good question.
I will use the table above as an example. For the first example I will use the single column indexes as we did when created the table above. So, we have an index for username and an index for email. If I run a query like this:
select * from users where email = 'company@domain.com' the query will use the index and it will find the data we need really fast. Since emails must be unique, the query will probably use an index scan and it will get the data pretty fast.
Here I am doing a simple query to insert 1 million rows to the table.
CREATE OR REPLACE FUNCTION random_word() RETURNS VARCHAR AS $$
select string_agg(substr(characters, (random() * length(characters) + 1)::integer, 1), '') as random_word
from (values('ABCDE')) as symbols(characters)
join generate_series(1, 5) on 1 = 1
$$ LANGUAGE SQL;

INSERT INTO users(username, full_name, email, role)
SELECT random_word(),
    'john mayer',
    md5(random()::text),
    'singer'
FROM generate_series(1, 1000000);

explain analyze select * from users where email = '0000073b18a59e1bf520ea00e2cc3e4f'; -- We set emails as md5.
The command above will create uniq emails with md5 and multiple usernames with 1 to 5 letters ranging from A to E. The explain analyze that is running in the end of this script will return something like this:
Index Scan using users_email_index on users  (cost=0.42..8.44 rows=1 width=64) (actual time=0.034..0.034 rows=0 loops=1)
Index Cond: ((email)::text = '0000073b18a59e1bf520ea00e2cc3e4f'::text)
Planning Time: 0.120 ms
Execution Time: 0.057 ms
If we create a multicolumn index for username and email, in the database, instead of having two indexes we would have just one index for the two columns. This works great if we know we are querying always using the two columns as filter together or the first column in the index which is the email. But the second we use only the username in the query, like this:
select * from users where username = 'john' things don’t work as expected even though we have an index with email and username. Postgres will do something like this:
Gather  (cost=1000.00..18141.63 rows=243 width=64) (actual time=1.918..63.350 rows=43 loops=1)
Workers Planned: 2
Workers Launched: 2
->  Parallel Seq Scan on users  (cost=0.00..17117.33 rows=101 width=64) (actual time=4.853..56.486 rows=14 loops=3)
Filter: ((username)::text = 'john'::text)
Rows Removed by Filter: 333319
Planning Time: 0.510 ms
Execution Time: 63.379 ms
This happens because postgres will only use the index if the column in the filter is the first column in a multi column index. In this case, username is the second column and the index will not be used.
Since we don’t know for sure which queries the application will do, we preferred to create single column indexes instead of multi column ones.
Indexes are important and most of the times they are hard to get it right, if you add too many indexes you can make your insert/updates way slower than they should be, but your queries will probably be fast, but if you add too few indexes you will probably get queries that take too much time.
Migrations are one step. Next Step is the Schema
Migrations are only one step of the process we also need to create the ecto schema. So let’s create one for the users table now
defmodule BlogPosts.Accounts.User do
  use Ecto.Schema
  import Ecto.Changeset

  schema "users" do
    field :username, :string
    field :role, :string
    field :email, :string
    field :full_name, :string

    timestamps(type: :utc_datetime)
  end

  @doc false
  def changeset(user, attrs) do
    user
    |> cast(attrs, [:username, :email, :full_name, :role])
    |> validate_required([:username, :email, :full_name, :role])
    |> unique_constraint([:email])
  end
end
This is the schema we need to create to represent the users table in our application. There is nothing new in this besides the changeset function.
Ecto does not change or create the data directly, it does this using changesets. You can think of changesets as the middleware that checks your data and transform it before inserting/updating it into the database.
In this case ecto is keeping the fields you set in the cast function, then it is checking if the fields in the validate_required function are informed, and last but not least the unique_constraint will tell ecto that we do have a unique index for the email field and if the database return an error indicating we are violating this index, ecto will translate the error into a changeset error so we can better deal with it in our application.
But hey, if you think you don’t need to write all this code for all the tables you are right. There is a better way if you are using phoenix as we will see in the next section
Better way to create migrations and schemas with Phoenix
You don’t need to write all this code by yourself, and you can thanks to the magic of generators. If you created your application using phoenix, this means that you have the phoenix generators at your disposal. If you write the following in your shell you will get a list of available commands for you to try:
-> mix phx
Phoenix v1.7.11
Peace of mind from prototype to production

## Options

-v, --version        # Prints Phoenix version

mix phx.digest       # Digests and compresses static files
mix phx.digest.clean # Removes old versions of static assets.
mix phx.gen          # Lists all available Phoenix generators
mix phx.gen.auth     # Generates authentication logic for a resource
mix phx.gen.cert     # Generates a self-signed certificate for HTTPS testing
mix phx.gen.channel  # Generates a Phoenix channel
mix phx.gen.context  # Generates a context with functions around an Ecto schema
mix phx.gen.embedded # Generates an embedded Ecto schema file
mix phx.gen.html     # Generates context and controller for an HTML resource
mix phx.gen.json     # Generates context and controller for a JSON resource
mix phx.gen.live     # Generates LiveView, templates, and context for a resource
mix phx.gen.notifier # Generates a notifier that delivers emails by default
mix phx.gen.presence # Generates a Presence tracker
mix phx.gen.release  # Generates release files and optional Dockerfile for release-based deployments
mix phx.gen.schema   # Generates an Ecto schema and migration file
mix phx.gen.secret   # Generates a secret
mix phx.gen.socket   # Generates a Phoenix socket handler
mix phx.new          # Creates a new Phoenix v1.7.10 application
mix phx.new.ecto     # Creates a new Ecto project within an umbrella project
mix phx.new.web      # Creates a new Phoenix web project within an umbrella project
mix phx.routes       # Prints all routes
mix phx.server       # Starts applications and their servers
The one that we are interested right now is the mix phx.gen.schema. We will create all the tables using this generator now.
First let’s create the users table again:
mix phx.gen.schema Accounts.User users username:string email:string full_name:string role:stringThis will generate the users migration and the user schema. But this generator is not perfect, they don’t know what are the indexes you want to add for the table, so you need to go to the migration you just created and add the index yourself.
The next table we want to create is the posts. Let’s use the same command to generate it and then we will take a look at the code that this command generates when we have a foreign_key and what are the changes we need to do.
mix phx.gen.schema Blog.Post posts title:string body:text status:string user_id:references:users
Wow, what is this references? Calm down padawan.
The user_id:references:users is just the way we tell phoenix to generate a foreign key with the name user_id that is referencing the id in the users table. The following are the migration and the schema that this code generates:
defmodule BlogPosts.Repo.Migrations.CreatePosts do
  use Ecto.Migration

  def change do
    create table(:posts) do
      add :title, :string
      add :body, :text
      add :status, :string
      add :user_id, references(:users, on_delete: :nothing)

      timestamps(type: :utc_datetime)
    end

    create index(:posts, [:user_id])
    create index(:posts, [:title]) # This index we manually added.
  end
end

defmodule BlogPosts.Blog.Post do
  use Ecto.Schema
  import Ecto.Changeset

  schema "posts" do
    field :status, :string
    field :title, :string
    field :body, :string
    field :user_id, :id

    timestamps(type: :utc_datetime)
  end

  @doc false
  def changeset(post, attrs) do
    post
    |> cast(attrs, [:title, :body, :status])
    |> validate_required([:title, :body, :status])
  end
end
One thing we need to do in the Post schema is to add the association with user instead of using the user_id. So the code in the end will be something like this:
defmodule BlogPosts.Blog.Post do
  use Ecto.Schema
  import Ecto.Changeset

  schema "posts" do
    field :status, :string
    field :title, :string
    field :body, :string
    belongs_to :user, BlogPosts.Accounts.User # Field changed

    timestamps(type: :utc_datetime)
  end

  @doc false
  def changeset(post, attrs) do
    post
    |> cast(attrs, [:title, :body, :status, :user_id]) # Added user_id here and in the line below
    |> validate_required([:title, :body, :status, :user_id])
  end
end
This will do for our user and the post. The next one we will create is the comments table and with that I can show you how to use ecto to create data for those tables. There are some ways that we can create data and we will go through some of them. But first let’s create the comments table.
mix phx.gen.schema Blog.Comment comments title:string body:text user_id:references:users parent_comment_id:references:comments status:stringThis will generate:
defmodule BlogPosts.Repo.Migrations.CreateComments do
  use Ecto.Migration

  def change do
    create table(:comments) do
      add :title, :string
      add :body, :text
      add :status, :string
      add :user_id, references(:users, on_delete: :nothing)
      add :parent_comment_id, references(:comments, on_delete: :delete_all) # Changed by me

      timestamps(type: :utc_datetime)
    end

    create index(:comments, [:user_id])
    create index(:comments, [:parent_comment_id])
  end
end

# I MADE SOME MODIFICATIONS ALREADY

defmodule BlogPosts.Blog.Comment do
  use Ecto.Schema
  import Ecto.Changeset

  schema "comments" do
    field :status, :string
    field :title, :string
    field :body, :string
    field :user_id, :id
    belongs_to :parent_comment, BlogPosts.Blog.Comment

    timestamps(type: :utc_datetime)
  end

  @required_fields [:title, :body, :status, :user_id]
  @valid_fields [:parent_comment_id] ++ @required_fields

  @doc false
  def changeset(comment, attrs) do
    comment
    |> cast(attrs, @valid_fields)
    |> validate_required(@required_fields)
  end
end
And the comment_posts table:
defmodule BlogPosts.Repo.Migrations.CreateCommentPosts do
  use Ecto.Migration

  def change do
    create table(:comment_posts) do
      add :post_id, references(:posts, on_delete: :nothing)
      add :comment_id, references(:comments, on_delete: :nothing)

      timestamps(type: :utc_datetime)
    end

    create index(:comment_posts, [:post_id])
    create index(:comment_posts, [:comment_id])
  end
end

defmodule BlogPosts.Blog.CommentPost do
  use Ecto.Schema
  import Ecto.Changeset

  schema "comment_posts" do
    belongs_to :post, BlogPosts.Blog.Post
    belongs_to :comment, BlogPosts.Blog.Comment
    timestamps(type: :utc_datetime)
  end

  @required_fields [:comment_id, :post_id]

  @doc false
  def changeset(comment_post, attrs) do
    comment_post
    |> cast(attrs, @required_fields)
    |> validate_required(@required_fields)
  end
end
Feel free to generate all the other tables if you want to. From now on we will focus on the ways ecto let us create and update data for these tables. But first a disclaimer.
There are other ways to do this modeling. Specially if you came from ruby on rails you will probably be tempted to create a column
resource_idand aresource_typeor something like that in thecommentstable so you will not need to use many to many associations. This is one approach but I truly believe is flawed. For multiple reasons but the main one is that you can’t use foreign keys when you are implementing this solution and this is problematic because you can have problems with data consistency, specially when you let others (AKA THE CEO) change data directly into the database production. (NEVER DO THIS)
Anyways, let’s move on.
How to insert comments into a post
Ecto has many ways to deal with associations when inserting or updating data. But, when you are inserting only one resource at a time you should keep it simple and not use put_assoc or cast_assoc. In our case we only want to insert a comment in an existing post and the related comment_post association. We can do this in two ways, here it is the first one:
  # %{title: "Title", body: "body", status: :active, user_id: 1, post_id: 1}
  def create_comment(attrs) do
    Repo.transaction(fn ->
      {:ok, comment} =
        %Comment{}
        |> Comment.changeset(attrs)
        |> Repo.insert()

      {:ok, _comment_post} =
        %CommentPost{}
        |> CommentPost.changeset(%{comment_id: comment.id, post_id: attrs[:post_id]})
        |> Repo.insert()

      comment
    end)
  end
Here we are creating a comment and a comment post in the same transaction because we need to insert both together or none of them. We are using pattern matching to check if both inserts are {:ok, _} and, in this case we will return a {:ok, comment}.
There is another way that we can do the same thing using Multi. Here it goes:
# %{title: "Title", body: "body", status: :active, user_id: 1, post_id: 1}
  def create_comment(attrs) do
    Ecto.Multi.new()
    |> Ecto.Multi.insert(:comment, Comment.changeset(%Comment{}, attrs))
    |> Ecto.Multi.insert(:comment_post, fn %{comment: comment} ->
      CommentPost.changeset(%CommentPost{}, %{comment_id: comment.id, post_id: attrs[:post_id]})
    end)
    |> Repo.transaction()
  end
Here we are doing the same thing but in this case we are stacking multi inserts that will be executed when we call Repo.transaction(). The way multi works is by sending to the next multi the result of the prior multi in a function. That’s why the second multi receives a function with the comment param that can be used to create the CommentPost changeset.
Now let’s see how we can insert many classes to a course
Now I want you to create the table courses and the table classes using the same generators we used above so we can work together with the examples below. To make sure you did it right, here it is my migrations and schemas.
First for the courses table:
defmodule BlogPosts.Repo.Migrations.CreateCourses do
  use Ecto.Migration

  def change do
    create table(:courses) do
      add :title, :string
      add :body, :text

      timestamps(type: :utc_datetime)
    end

    create index(:courses, [:title])
  end
end

defmodule BlogPosts.Education.Course do
  use Ecto.Schema
  import Ecto.Changeset

  schema "courses" do
    field :title, :string
    field :body, :string
    has_many :classes, BlogPosts.Education.Class

    timestamps(type: :utc_datetime)
  end

  @doc false
  def changeset(course, attrs) do
    course
    |> cast(attrs, [:title, :body])
    |> validate_required([:title, :body])
  end

  def create_course_with_classes(course, attrs) do
    course
    |> cast(attrs, [:title, :body])
    |> validate_required([:title, :body])
    |> put_assoc(:classes, attrs[:classes])
  end
end
And now the classes table:
defmodule BlogPosts.Repo.Migrations.CreateClasses do
  use Ecto.Migration

  def change do
    create table(:classes) do
      add :title, :string
      add :body, :text
      add :course_id, references(:courses, on_delete: :nothing)

      timestamps(type: :utc_datetime)
    end

    create index(:classes, [:course_id])
    create index(:classes, [:title])
  end
end

defmodule BlogPosts.Education.Class do
  use Ecto.Schema
  import Ecto.Changeset

  schema "classes" do
    field :title, :string
    field :body, :string
    belongs_to :course, BlogPosts.Education.Course

    timestamps(type: :utc_datetime)
  end

  @doc false
  def changeset(class, attrs) do
    class
    |> cast(attrs, [:title, :body, :course_id])
    |> validate_required([:title, :body, :course_id])
  end
end
Now we are going to use put_assoc to insert many classes to a course. Imagine we have an interface where the user can create a course and multiple classes at the same time and then hit Save All. In this situation you will eventually receive params like this:
params =
	%{
		title: "Awesome Course",
		body: "Testing awesomeness",
		classes: [
			%{title: "Class 1", body: "Super Body"},
			%{title: "Class 2", body: "Super Body 2"},
		]
	}

BlogPosts.Education.Course.create_course_with_class(%Course{}, params)
And to deal with such a params your create_course_with_class function needs to use put_assoc like this:
  def create_course_with_classes(course, attrs) do
    course
    |> cast(attrs, [:title, :body])
    |> validate_required([:title, :body])
    |> put_assoc(:classes, attrs[:classes])
  end
In this casse put_assoc will get all the classes and will do an insert for each class. It will also set the course_id to the classes.
But keep in mind you should use this function only when creating a course with multiple classes. put_assoc works with the whole data so if you already have a course and you are trying to add more classes to it and you are passing a list of classes to be added to this course you will receive an error. The error you probably look like this:
** (RuntimeError) you are attempting to change relation :classes of
BlogPosts.Education.Course but the `:on_replace` option of this relation
is set to `:raise`.
And this is happening because put_assoc works with the whole associated data. Ecto does not know that you want to add more data to it. It raises because it knows that you already have data in the table classes for that particular course.
If you want to use put_assoc to add more classes to an existent course that already have classes to it, you need to preload the classes from the course, and, when calling put_assoc, you will need to merge the existent classes with the ones that you are trying to add now, like this:
  # Load the course with the classes before call this function. Something like this:
  course = BlogPosts.Repo.get(BlogPosts.Education.Course, course_id) |> BlogPosts.Repo.preload([:classes])

  def create_course_with_classes(course, attrs) do
    course
    |> cast(attrs, [:title, :body])
    |> validate_required([:title, :body])
    |> put_assoc(:classes, course.classes ++ attrs[:classes])
  end
It works that way. It works because ecto will see that you are passing all the existent classes (they have an id populated) and the new classes in the params and it will insert the new classes.
See, this is a common confusion when using put_assoc. And this is the main reason you usually don’t see large codebases using it because they are usually used in special cases like this.
Now you know how to create migrations and a little bit about how to insert data with and without associations. Next time I will talk about Ecto.cast_assoc and Ecto.build_assoc so we can cover how to deal with data in those situations.
I hope you are having a great week. See you next time.